 Using Color to See More - Making 3D Anaglyphs The Caves of Mars | Education Resources | MER Color Index | ||
Overview: One of the more important aspects of driving around on another planet, is the ability to be able to tell where the bumps are. This is easy for most of us, as we have two eyes, allowing our brains to combine the slightly different views into a sense of depth. But how do we give that depth perception to our robot eyes on Mars? Turns out, in much the same way. One of the more important aspects of driving around on another planet, is the ability to be able to tell where the bumps are. This is easy for most of us, as we have two eyes, allowing our brains to combine the slightly different views into a sense of depth. But how do we give that depth perception to our robot eyes on Mars? Turns out, in much the same way.The Spirit Rover takes two pictures of the same view. Only each image is seperated, like ours eyes, by several inches. As a result, each scene is slightly different. The trick is getting the two views into one three dimensional image. But it's an easy trick, used for many years in Hollywood to create 3D movies. On the Mars Exploration Rover site, under the "Raw Images" section, there are two sections that have stereo pairs: Engineering Cameras: This includes the Front and Rear Hazard Cameras, mounted on the lower portions of the rover. These cameras have an extremely wide angle "fish-eye" view. These help the drivers see if there is anything in the way. The Navigation Cameras are mounted on the upper mast of the rover, just between the Panaramic Cameras. The filenames for each of the images include the letters "L" or "R" followed by a zero near the end of the name, to designate which file is the right and which is the left view. Science Cameras: The Panaramic Cameras each include a filter wheel, allowing for each camera to "see" in different frequencies, or "colors." The left PanCam has three filters that correspond to red, green and blue, allowing color images to be created. The right filter wheel however, lacks these three filters, so that color stereo images are not readily available, (although it might be possible to artificially create them!) There are two common settings on each wheel two allow for stereo imaging of two frequencies, in violet and shortwave infrared. Like the three engineering cameras, the PanCam filenames also include the left or right designator, with a number replacing the zero, to designate the filter used, (see About the PanCam). Also in this catagory is the Microscopic Imager. While it is only one camera, several of the images from Sol 15 have a slight seperation, and as a result will render stereo views of the Martian regolith, or "dirt." The trick for viewing stereo images is to get each view to its proper eye. There are several ways to do this. The "Viewmaster" 3D reel viewers force one's eyes to the correct image. Another popular method used for viewing black and white images uses two contrasting colors, (usually red and blue) printed over each other. The viewer then puts on special glasses with color filters in place, corresponding to the colors used in the image. The result is that the red filters out the red image, allowing the blue to be visible, while the blue filters out the blue and allows the red through. This is the same technique used since the 1950s for black and white 3D movies. Stereo images made this way are called "anaglyphs." Below are instructions on how you can make your own stereo anaglyphs from Mars! Materials Required:
| ||
| 1. | Locate a pair of images from the Raw Images section of the NASA MER site: Choose either Spirit or Opportunity. Click on the first of a pair of images for the intermediate page. Then click the RIGHT mouse button on the displayed image of the first picture, (CLICK AND HOLD on a Macintosh) then choose "SAVE LINK TARGET AS" This allows you to save the bigger image that is linked from the smaller displayed picture. Don't choose "SAVE IMAGE" or you will end up saving this smaller version instead. Save the file into an appropriate folder on your computer. Repeat the process for the other one. | 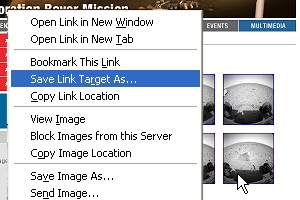 |
| 2. | The NASA filenames are quite long, so if you decide to shorten them, be sure to keep the "L" and "R" in the name so you can remember which of the pair goes where, (for example, "mars01L.jpg" and "mars01R.jpg"). Note however much information is stored in the filename itself, so it might be a good idea to save with the original names, then shorten them later if need be. Remember, with the PanCam images to note the filter used as well as the 'eye.' Only two pairs of filters are the same: L2/R2 (Infrared) & L7/R1 (violet). To work properly, they should have similar exposures. Click Here to learn about filenames. | 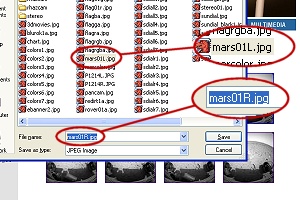 |
| 3. | Open PhotoShop (or another digital image editor) and prepare the work area. First, from the WINDOW menu, click SHOW CHANNELS. A window should popup with several tabs, the center of which says "CHANNELS." It will be blank until we open a file. | 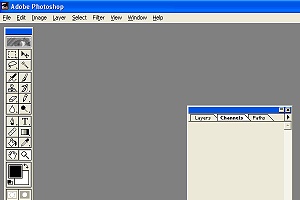 |
| 4. | Load the two images into PhotoShop. Notice how four tiny thumbnail versions of each image appear in the CHANNELS window. The MER team saves all these images as 24-bit .JPG "color" images, even though they originated on Mars as 8-bit grayscale pictures. The first task will be to "flatten" the images by selecting from the IMAGE menu MODE and selecting GRAYSCALE. An alert box will pop-up asking if you want to DISCARD COLOR INFORMATION. Click OK, as there is none anyway. The three color thumbnails go away and the one labeled RGB has now changed to "BLACK." Repeat for the other picture. | 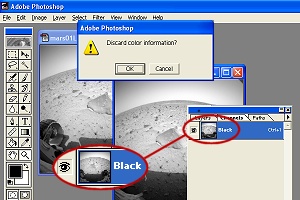 |
Next we will create a new, blank 24-bit color image to dump our two stereo pair pictures into... | ||
| 5. | From the FILE menu, select NEW, then give it a simple name. For WIDTH and HEIGHT, select PIXELS from the pull-down menus to the right. The new image must be exactly the same size as the two individual grayscale pictures. The full frames of the MER images are 1024 pixels square. So type that into both WIDTH and HEIGHT. RESOLUTION applies to the print size, so set it to 150 PIXELS PER INCH for now. This will make your final picture fit on a single sheet of paper. A higher number makes the picture smaller. For MODE insure that RGB COLOR is selected. Under CONTENTS check WHITE. Click OK. The CHANNELS window will show four white boxes when our new image is selected. | 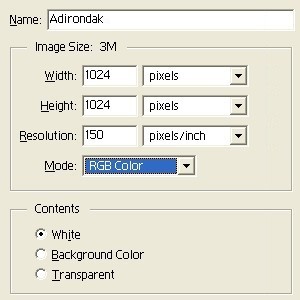 |
| So far we should have THREE images open: The two black & white stereo pairs, both flattened to 8-bit grayscale, and a blank white 24-bit color image. Now its time to combine the two into one... | 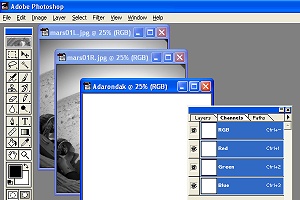 | |
| 6. | Select the LEFT view of the two stereo images by clicking on it, (look for the "L" in the filename towards the end). From the SELECT menu choose ALL. A moving dotted line will appear around the image indicating that it has been selected. From the EDIT menu choose COPY. This copies the image into your computer's memory. | 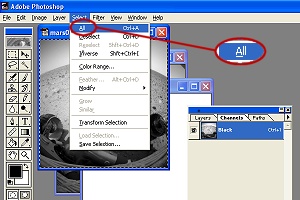 |
| 8. | Select the new blank image by clicking on it. In the CHANNELS window, click the RED bar. The other three, (RGB, GREEN & BLUE) should all turn "off". Only the red channel is accessable, (it will have an "eye" to the left). From the EDIT menu, select PASTE. The left view we just copied should now be in the blank new image. The RGB bar's picture now shows a light blue, or "cyan" version of the left picture. | 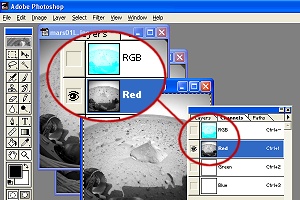 |
| 9. | Select the RIGHT view, and choose SELECT/ALL then EDIT/COPY like we did with the left view. Again return to the new image. This time click once in the GREEN bar, and then EDIT/PASTE. Next, select the BLUE bar and do the same: EDIT/PASTE the right view in. Click on the upper bar in CHANNELS labeled RGB. Choose FILE/SAVE to save your image. | 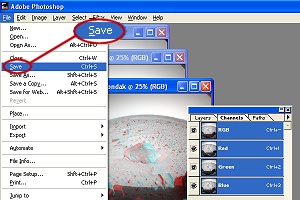 |
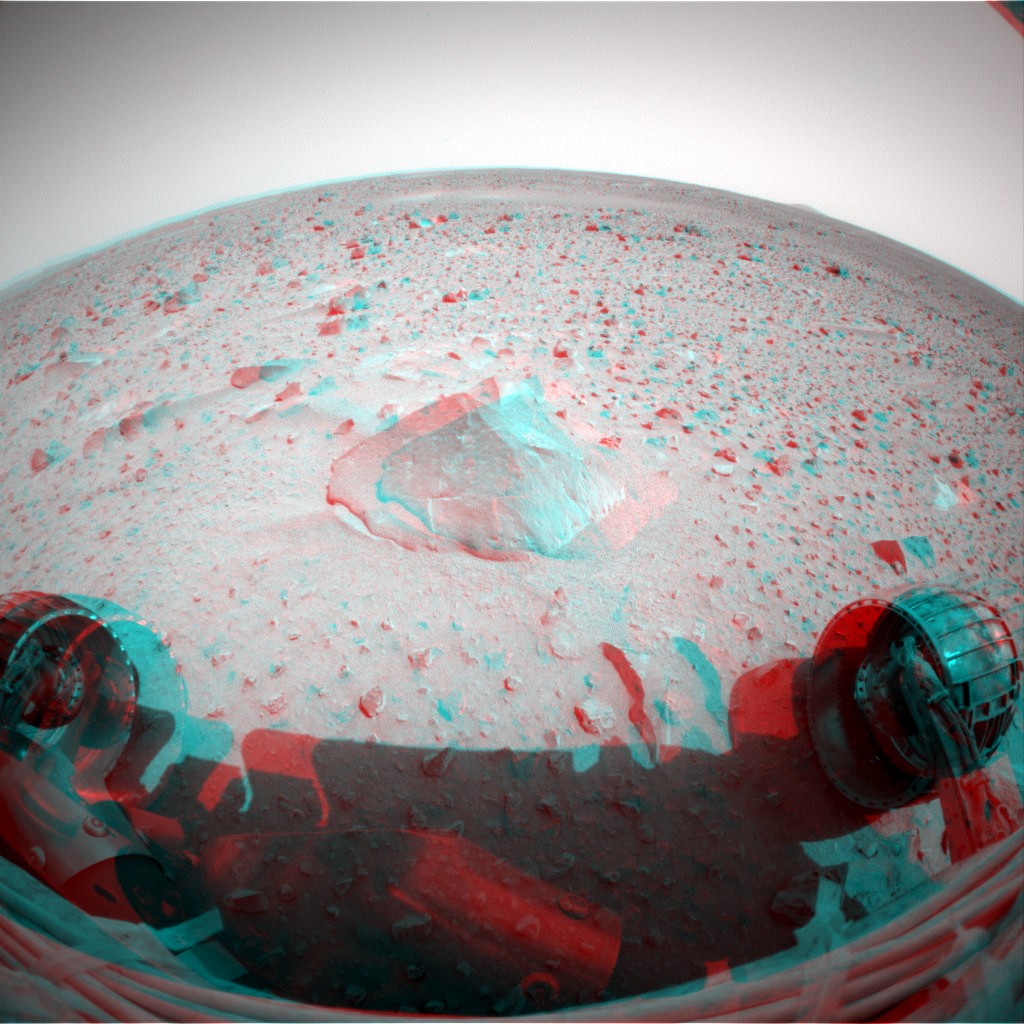
| 10. | Put on your 3D Red/Blue glasses and look at Mars in depth! The color filters in the glasses allow only one view through each side: The red on the left allows only the blue view through, while the blue side allows only the red view through. The result is that each eye sees a different single view, and our brain combines them into a three dimensional scene. Try it with Your Own Pictures! Take a digital camera, and make your own stereo pairs. Choose a scene, concentrating on an object within the center of the scene, and snap a picture. Move the camera slightly to the right and take another with your object in the same location as in the first shot. Use the above proceedure to create a stereo shot. Experiment with different distances between the two shots. This is known as the "baseline." Usually the baseline is the distance between our eyes, (about 2-3 inches). The farther away from the camera, the bigger the baseline needs to be for the stereo effect to be apparent. Of course, with small subjects, the baseline should be shorter. How would you take stereo pictures of a distant mountain range and the petals of a flower? |
 (Click Image for the Full-Sized Image) |
All Images Courtesy NASA/JPL Mars Exploration Rover Mission The Caves of Mars Project is funded by a NIAC Phase II Grant from the NASA Institute for Advanced Concepts. Copyright © 2002-04 - Complex Systems Research; Inc. | ||