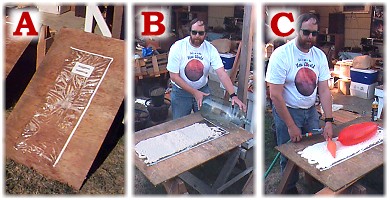
 After much experimentation, a proper technique for foam tube construction was established. The first step, [A], involved stapling a sheet of plastic on the plywood base. To this, a layer of Great Stuff® minimal expansion foam was applied. After it had set for 30 minutes or so, (after the surface had hardened), this base was flattened with a large glass home brew "carboy," [B]. This was followed by carefully filling two water balloons, [C] on the base. Care must be taken to insure that the balloons do not break at this point. An extra pair of hands are helpful to guide the filling balloon, making sure that it does not cinch on the surface and pop. After much experimentation, a proper technique for foam tube construction was established. The first step, [A], involved stapling a sheet of plastic on the plywood base. To this, a layer of Great Stuff® minimal expansion foam was applied. After it had set for 30 minutes or so, (after the surface had hardened), this base was flattened with a large glass home brew "carboy," [B]. This was followed by carefully filling two water balloons, [C] on the base. Care must be taken to insure that the balloons do not break at this point. An extra pair of hands are helpful to guide the filling balloon, making sure that it does not cinch on the surface and pop. |
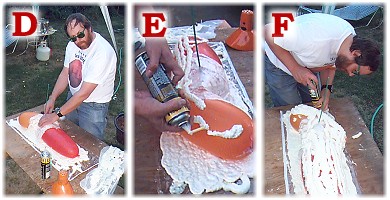 Next was joining the two water balloons together. This was done with plastic grocery bags, [D]. The plastic was held in place with celophane tape. Then the foam was applied to the exterior of the ballons, [E]. For this, we used the "Triple Expansion" foam. We also cut the plastic tube on the business end of this at a diagonal, so that the foam would come out in long flat ribbons. Working length-wise down the balloons, we built up a thick layer of foam that cover the majority of the surface, [F]. Brightly colored balloons were used, to better see the uncovered areas. After the foam set for 30 minutes or so, we "tamped down" the foam around the balloons, (with gloved hands!) to form a uniform shell of hardened foam. Next was joining the two water balloons together. This was done with plastic grocery bags, [D]. The plastic was held in place with celophane tape. Then the foam was applied to the exterior of the ballons, [E]. For this, we used the "Triple Expansion" foam. We also cut the plastic tube on the business end of this at a diagonal, so that the foam would come out in long flat ribbons. Working length-wise down the balloons, we built up a thick layer of foam that cover the majority of the surface, [F]. Brightly colored balloons were used, to better see the uncovered areas. After the foam set for 30 minutes or so, we "tamped down" the foam around the balloons, (with gloved hands!) to form a uniform shell of hardened foam. |
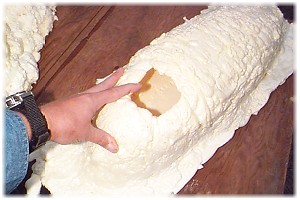 After setting over night, the foam had hardened, the balloons popped, and the water was drained out. The balloon material tends to stay in the finished tube, but will come out with minimal effort. The tube on the left was left with a large "skylight" opening in it, that facilitated the removal of the balloon debris. The second tube will have to wait for the splitting. The next steps will include cutting the tubes length-wise, and painting them with a suitable color and texture to mirror natural lava. Then scale model habitats will be constructed, as well as an inter-changeable surface: gray & cratered for the Moon and red with more traditional lava flow features for Mars. After setting over night, the foam had hardened, the balloons popped, and the water was drained out. The balloon material tends to stay in the finished tube, but will come out with minimal effort. The tube on the left was left with a large "skylight" opening in it, that facilitated the removal of the balloon debris. The second tube will have to wait for the splitting. The next steps will include cutting the tubes length-wise, and painting them with a suitable color and texture to mirror natural lava. Then scale model habitats will be constructed, as well as an inter-changeable surface: gray & cratered for the Moon and red with more traditional lava flow features for Mars. |


The Caves of Mars Project is funded by a NIAC Phase II Grant from the NASA Institute for Advanced Concepts.
Copyright © 2002-04 - Complex Systems Research; Inc. |