|
 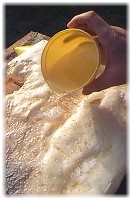 With our lava tube caves finished, the only task remaining besides painting, is the creation of a suitable planetary surface with our cratered "moon molds." The first step requires pouring a thin layer of epoxy resin over the top of the model. In our case, several layers were required to "level out" our surface, and fill in the voids left by the expanding foam. Once leveled, our final layer is spread out, and another thin layer is applied to the business side of the moon mold. This step helps minimize air bubble formations. Some will occur anyway, but who will notice another circular depression? The mold is then flipped over and plopped down on top of the wet surface, and air bubbles are smoothed out. With our lava tube caves finished, the only task remaining besides painting, is the creation of a suitable planetary surface with our cratered "moon molds." The first step requires pouring a thin layer of epoxy resin over the top of the model. In our case, several layers were required to "level out" our surface, and fill in the voids left by the expanding foam. Once leveled, our final layer is spread out, and another thin layer is applied to the business side of the moon mold. This step helps minimize air bubble formations. Some will occur anyway, but who will notice another circular depression? The mold is then flipped over and plopped down on top of the wet surface, and air bubbles are smoothed out. |
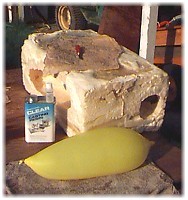
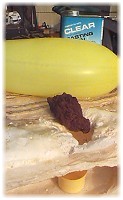 Once in place, we found that the irregular surface required something to weigh down the mold to keep it in contact to insure proper crater formation. A water balloon placed on top was the perfect solution. The dead weight coupled with the flexibilty allowed the balloons to weigh down the moon mold while conforming to the shape of the model surface. Additional weights were used, such as this piece of red lava from Central Oregon, (left). Also note the addition of the yellow paint cap below the skylight opening. This was to collect the tiny drips of liquid epoxy so that it would not form any small deposits on the floor of our lava tube cave. Once in place, we found that the irregular surface required something to weigh down the mold to keep it in contact to insure proper crater formation. A water balloon placed on top was the perfect solution. The dead weight coupled with the flexibilty allowed the balloons to weigh down the moon mold while conforming to the shape of the model surface. Additional weights were used, such as this piece of red lava from Central Oregon, (left). Also note the addition of the yellow paint cap below the skylight opening. This was to collect the tiny drips of liquid epoxy so that it would not form any small deposits on the floor of our lava tube cave. |


The Caves of Mars Project is funded by a NIAC Phase II Grant from the NASA Institute for Advanced Concepts.
Copyright © 2002-04 - Complex Systems Research; Inc. |