 |
 |
 |
| Step 6: Pealing off the Crater Mold |
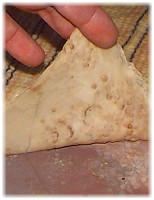 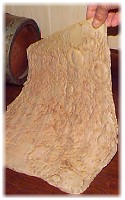 After multiple coats of the mold goop, the molds had thickened enough to hopefully hold up to multiple uses. So the molds were pealed off the moon slice. While some residual crud from the lunar surface transfered over to the mold, (left), this generally scraped off with minor effort. The final result, (right), was a "negative" moon-scape mold that will impart a nice cratered terrain to the surface of our model. A loose-weaved dish rag was embedded into the large mold. This does indeed noticeably increase the strength of the largest mold. And an early fear that the mold would take on the curvature of the moon failed to materialize. The finished molds flattened out nicely! After multiple coats of the mold goop, the molds had thickened enough to hopefully hold up to multiple uses. So the molds were pealed off the moon slice. While some residual crud from the lunar surface transfered over to the mold, (left), this generally scraped off with minor effort. The final result, (right), was a "negative" moon-scape mold that will impart a nice cratered terrain to the surface of our model. A loose-weaved dish rag was embedded into the large mold. This does indeed noticeably increase the strength of the largest mold. And an early fear that the mold would take on the curvature of the moon failed to materialize. The finished molds flattened out nicely! |
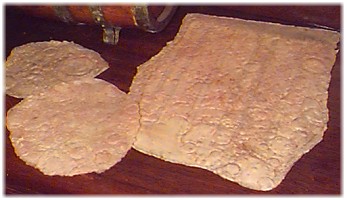 Two smaller molds were created on either end of our "moon slice." These will be used for smaller areas of the surface. Experiments were then performed with the two-part epoxy foam as a base material for the crater surface. While good looking results were achieved, the final product was soft, and easily scarred. Casting resin was choosen instead, despite it's nasty smell. A few layers were applied over several days to "smooth out" the native foam surface. Then a final layer was laid down, and at the same time, the business end of the mold was "wetted" with the resin. This step helps minimize bubbles forming underneath the mold. It was then flopped down on the still wet surface of the model, and was smoothed out and allowed to harden. Two smaller molds were created on either end of our "moon slice." These will be used for smaller areas of the surface. Experiments were then performed with the two-part epoxy foam as a base material for the crater surface. While good looking results were achieved, the final product was soft, and easily scarred. Casting resin was choosen instead, despite it's nasty smell. A few layers were applied over several days to "smooth out" the native foam surface. Then a final layer was laid down, and at the same time, the business end of the mold was "wetted" with the resin. This step helps minimize bubbles forming underneath the mold. It was then flopped down on the still wet surface of the model, and was smoothed out and allowed to harden. |


The Caves of Mars Project is funded by a NIAC Phase II Grant from the NASA Institute for Advanced Concepts.
Copyright © 2002-04 - Complex Systems Research; Inc. |